Tutorial
Thank you for using KITTY!
This tutorial takes you through making a small top-down game from scratch, using Tiled to make your game. KITTY imports it into Unity, where you can add game-specific behaviours to tiles and objects from Tiled.
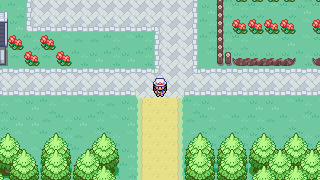
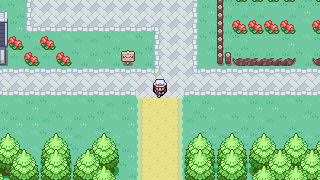
The end result is a grid-based, animated character controller able to interact with signs, NPCs, and doors which are all defined in Tiled. It plays like this:

Tutorial teaser
Keep in mind that this is just an example project to get you started; KITTY can do much, much more than what this tutorial teaches.
Learning how to use Tiled is not part of this tutorial. Have a look at the Official Tiled Documentation for that.
TL;DR
Make tilemaps in Tiled with typed and possibly animated objects
Make prefabs in Unity with names that match Tiled objects’ types
Add built-in or custom components in Unity to your prefabs
Import, change, and reimport your tilemaps in Unity as needed
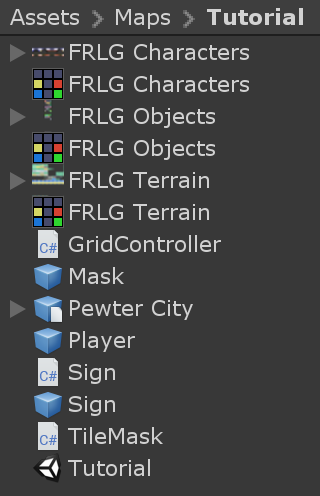
Images, Tilesets and Tilemaps
To begin making a tile-based game, you need to make or find neat tileset images with the same tile size. These determine what tiles you can build your map with, and to some extent what objects you can make.
You also need some character spritesheets, which are effectively also a form of tileset, but since we’ll be using them for objects rather than tiles, they don’t have to have the same tile size as your tilesets.
I went with tilesets and spritesheets from Pokémon FireRed/LeafGreen, modified to fit into a grid. Of course, if you plan to distribute your game, you can’t use tiles or sprites you don’t have a license to.
Tileset Images
Place the tileset images somewhere in the Assets folder, like in Assets/Maps/Tutorial. Ideally,
the Tiled tilesets and tilemaps you’re going to create will end up here, as well. Keeping
map-related images, tilesets, and tilemaps together makes it easier to maintain references and
update the files as you make your game.
Make sure to change the Texture Type in the image import settings to Sprite (2D and UI) – this takes care of proper scaling, and is the most fitting texture type for tiles and sprites.

Image import settings
If you’re making a pixel art game, you also want to set the Filter Mode to Point (no filter), and Compression to None. This keeps your pixels crisp.
Tilesets
Create a new tileset in Tiled for each of your tileset images, and save them in
Assets/Maps/Tutorial as well. Tilesets get the extension .tmx, so don’t worry about naming
them differently from the source image’s filename.
Make sure to set the Tile width and Tile height to match the tileset images’ tile size. If your tileset’s tiles have borders around them, you can set the margin and spacing accordingly.
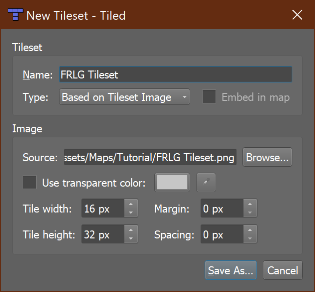
New tileset settings
If you haven’t worked with Tiled before, I recommend looking into Using the Terrain Brush in the official documentation, but don’t sweat it.
Feel free to define animations for any animated tiles in your tileset, as well. These will carry over to Unity with no extra setup.
Tilemaps
Now that you have some tilesets, it’s time to make a tilemap!
Anything goes, really. You don’t have to worry about interactable stuff like signs or NPCs just yet – we’ll get to those a bit further down. Feel free to add more Tile Layers if you need them.
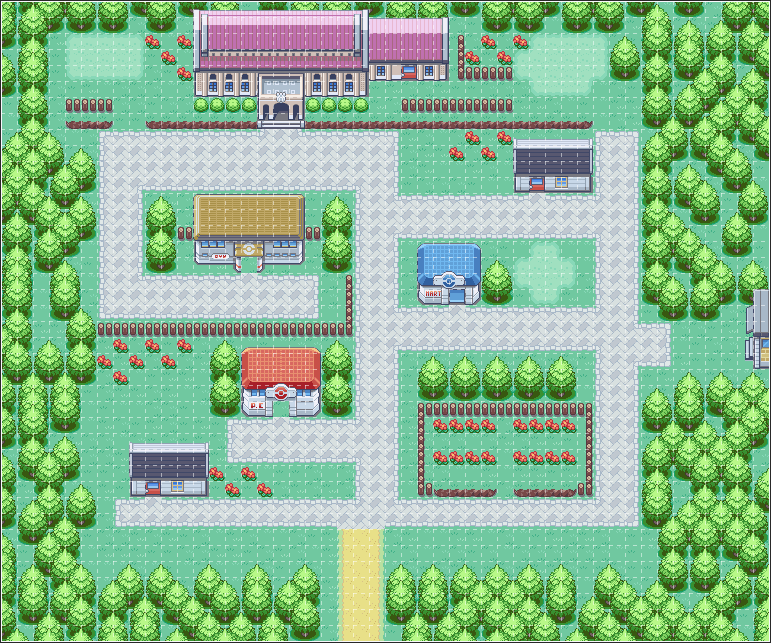
Modified Pewter City
I made a slightly changed Pewter City from Pokémon FireRed/LeafGreen.
Note that I didn’t bother adding signs yet, and I left out some doors. I will add those to an object layer later – that way I can directly define the sign texts and door destinations, respectively.
Like the tileset, you want to save your tilemap in Assets/Maps/Tutorial.
Initial Unity Import
Go ahead and drop the entire KITTY Unity Package into the root of your Assets folder.
If you saved your tilesets and tilemaps next to your tileset images, the folder contents should now look a bit like this:
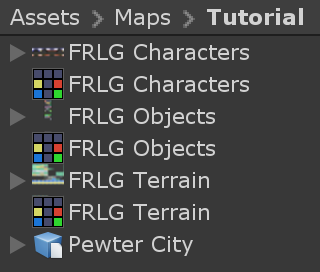
The colourful Tiled icons are tilesets, and the tilemap has been made into a prefab.
You can drop the tilemap prefab directly into the Hierarchy to see your work in the Scene view.
Note
Whenever you update your tilesets or tilemaps, or edit your tileset images, they automatically get reimported.
If you go into Play Mode now, any animated tiles will animate, but nothing else really happens. We’re going to change that!
Player Object
Of course, there are no objects yet – not even a Player. Let’s add a small character from a spritesheet, ideally with a few walking animation frames for each of the four directions. I went with Leaf from Pokémon FireRed/LeafGreen.
Character and object spritesheets don’t need to have the same tile size as the tilemap, as they’re not part of the grid. Leaf’s spritesheet, for example, uses 16×32 pixel sprites for each animation frame.
Note
You can make Tiled snap objects and other things to the tile grid by toggling it in View -> Snapping -> Snap to Grid.
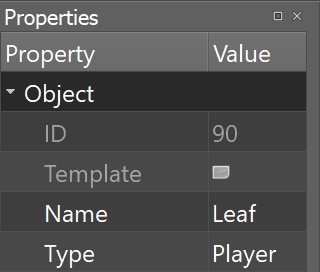
We can insert sprites of any size anywhere in the map as objects by adding an Object Layer. I called my layer Characters, added a Tile Object of Leaf from the character spritesheet, and set the object’s name to Leaf. You don’t have to give your objects names, but since they carry over to Unity, it will be easier to tell them apart if you do.
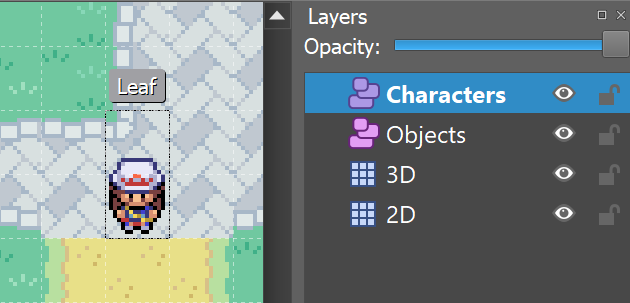
Player object in Tiled
So far, so good. When you switch to Unity now, you’ll see your character gets created as a
GameObject with the name you specified, followed by an object ID. A SpriteRenderer child has
automatically been added, and the GameObject even a small name label.
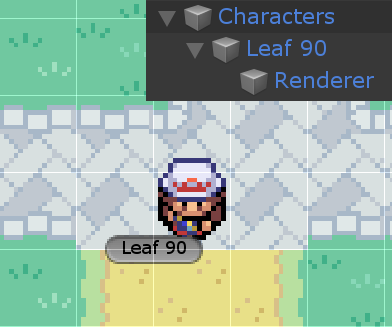
Player object in Unity
That’s all well and good, but the player doesn’t do anything, and adding components manually to every object that needs any will get tedious quickly.
Player Prefab
KITTY automatically generates a SpriteRenderer for us, and if your character sprite already has
an animation defined, the Renderer child will have a fully configured Animator
component as well. You could even go so far as to add collision shapes to your character sprite,
which would generate a PolygonCollider2D for each shape, but you won’t need to do that for your
character in this tutorial.
The ability to control how Tiled objects are translated to GameObjects is the primary feature
of KITTY, however!
Let’s have the Camera component on the Player GameObject instead of at the root
of the scene.
Start by removing the Main Camera GameObject from the scene. This will make the
Game view complain about a missing Camera.
Add an empty GameObject to the scene; this will become our Player prefab. Drag it
from the scene Hierarchy to the Project view to save it as a prefab asset – anywhere in the
Assets folder is fine, but let’s drag it into Assets/Maps/Tutorial for now. It’s important
to name it Player or something similar, because KITTY uses prefab names to translate
from Tiled objects to GameObjects.
Now that you have your empty Player prefab in your Assets folder, go ahead and
delete the Player instance from the scene, then double click the prefab to enter
Prefab Edit Mode.
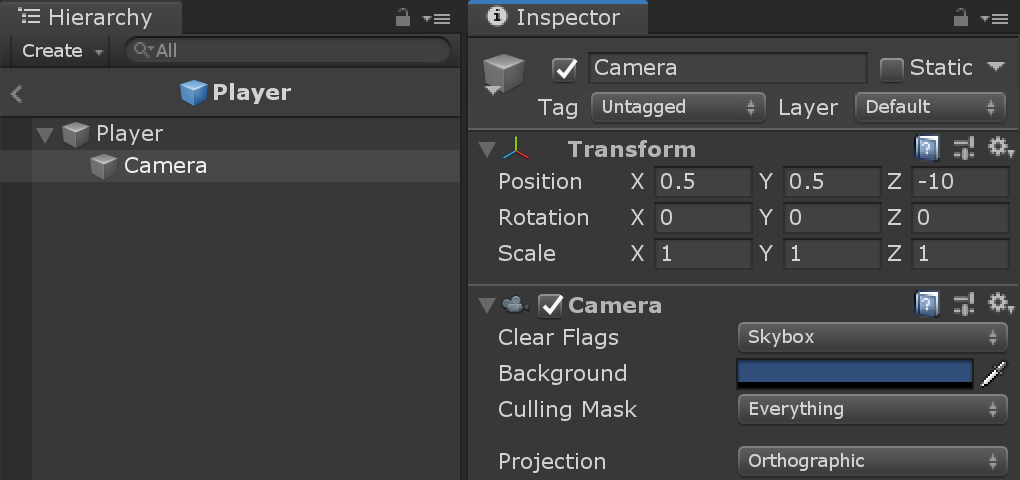
Add an empty child GameObject named Camera to the prefab, and set its position to
(0.5, 0.5, -10); every tile and object imported from Tiled is created at its bottom left
position, so to center the Camera child on the Player character, it needs to
be offset by half the width of a “tile” in your spritesheet. The -10 Z-position is just to make
sure the Camera doesn’t clip the tilemap and all its objects.
Finally for now, add a Camera component to the new Camera child, and set its
Projection to Orthographic.
We’ll return to the Player prefab to add more functionality later!
Note
If you want objects based on your new prefab to still have a label, you can choose a label
in the icon dropdown of your root Player GameObject in the top left corner of
the inspector.
Typed Objects
To let KITTY know that the character you added to the Characters object layer in Tiled should use your new Player prefab for instantiation, all you need to do is set the Type property of the object in Tiled.
Switching back to Unity, your Game view now shows the “game” with your character in the center.
Note
This approach – creating a named prefab (or prefab variant) and setting the “Type” property of an object or even a tile in Tiled – is the core way of defining the specific behaviours of your game.
Movement Script
Now we actually get to add game-specific behaviour to our game. First up is Player movement.
Adding Behaviours to Objects
Whenever a tile or object in Tiled has the Type Player, KITTY loads your Player prefab in its place. This holds true for any typed Tiled object/Unity prefab combination with matching names.
To define behaviours for objects, you simply add the components and child GameObjects you need
to the prefab that matches the object Type you want to define behaviours for.
Grid Movement
Let’s make the Player able to move by pressing the arrow keys (or any other directional input, like WASD or a joypad). For this tutorial, the player can move either horisontally or vertically, but not both at the same time.
Create a new C# script called GridController somewhere in your Assets folder with the
following contents:
using UnityEngine;

public class GridController : MonoBehaviour {
        void Update() {
                var input = new Vector2(Input.GetAxisRaw("Horizontal"), Input.GetAxisRaw("Vertical"));

                // Move one tile in an input direction, if any, preferring horizontal movement.
                if (input.x != 0f) {
                        transform.position += new Vector3(input.x, 0).normalized;
                } else if (input.y != 0f) {
                        transform.position += new Vector3(0, input.y).normalized;
                }
        }
}
Note
I’m using Input.GetAxisRaw to get the raw input data between -1 and 1, and
normalizing it to get a direction vector.
Now just add this new GridController component to your Player prefab by
double-clicking the prefab asset, and dragging or adding the component to the prefab’s root
GameObject (called Player). Reimport your tilemap to make Unity apply the changes to
your Player prefab.

Moving one tile per frame
Tile widths in KITTY are always exactly one Unity unit wide, so moving one unit in any direction corresponds exactly to moving one tile in that direction. Because we’re always adding integers, the character position doesn’t suffer from floating point inaccuracies.
Note
When you change a prefab, you need to reimport any tilemaps or tilesets that use that prefab.
If you reimport your tilemap and go into Play Mode, the character moves when you give it directional input, and it also stays exactly on the tile positions – but it’s way too fast, potentially moving one tile per frame!
Continuous Movement
When receiving directional input, we want the character to move a little bit every frame until it reaches the next tile. There are many ways to make things happen over time, but this is a KITTY tutorial, not a C# or Unity tutorial.
Let’s just add a small Walk method in our GridController class that does everything we want;
it moves the character a little bit each frame until it reaches the next tile.
We’ll be using an IEnumerator to call the method as a coroutine, so you need to add
using System.Collections to the top of the file, as well.
using UnityEngine;
using System.Collections;

public class GridController : MonoBehaviour {
        ///<summary>Walk to tile in `direction`.</summary>
        IEnumerator Walk(Vector3 direction) {
                // Disable the Update method until we're done walking one tile.
                enabled = false;

                // Move towards target, 1/16th tile per frame
                var target = transform.position + direction;
                while (transform.position != target) {
                        transform.position = Vector3.MoveTowards(transform.position, target, 1f / 16f);
                        yield return null; // Wait for one frame before continuing.
                }

                // Enable the Update method after we're done walking one tile.
                enabled = true;
        }
// …
}
Note
Moving by 1/16th unit won’t introduce floating point inaccuracies, because it’s a negative power of two.
We need to update the Update method to call our new Walk method as a coroutine, as well:
// …
if (input.x != 0f) {
        StartCoroutine(Walk(new Vector3(input.x, 0).normalized));
} else if (input.y != 0f) {
        StartCoroutine(Walk(new Vector3(0, input.y).normalized));
}
// …
Calling Walk as a coroutine makes it able to stop for a bit and continue on the next frame,
instead of running all the code immediately.
Moving one pixel per frame
This is very useful to us, since we want to move a little bit, wait for the next frame, and then move a little bit more – until we reach the target tile.
Colliders and Collision
The Player is currently unstoppable; there’s nothing to collide against, and no collisions ever happen.
Colliders
KITTY natively understands Collision Shapes defined in Tiled tilesets, and turns them into
Sprite Physics Shapes – sprite/tile Colliders. The entire tilemap has a CompositeCollider
component that composes all the individual tile layer colliders into one, for performance reasons.
This also means you can’t query what tile an object collided with, as Unity sees them all as the same, full-map composite collider. That’s fine for simple non-interactive collision shapes, though.
Since we’re making a grid-based topdown game, square collision shapes will suffice.
Open one of your tilesets in Tiled, switch to Tile Collision Editor mode in the top middle, and start drawing full-tile collision shapes for all the tiles that should be collidable.
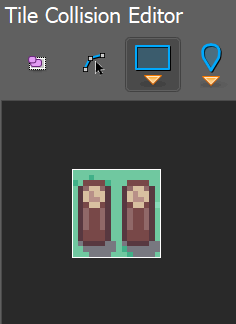
Adding tile Collision Shapes in the tileset
By defining the collisions in the tileset rather than the tilemap, the Collision Shapes are reused; you only need to define them once for each tile in the tileset, instead of having to make sure every collidable tile in your tilemap has a collider defined.
This is the reason KITTY imports tile Collision Shapes, but not object shapes, as colliders.
Back in Unity, the tilemap now has a Collider with all the Collision Shapes you defined.

I lowered the tilemap opacity to make the Collider more visible in the Scene view.
Collision
Your entire tilemap automatically got a full-map Collider in Unity by just defining a few tile
Collision Shapes in your Tiled tileset. Neat.
The Collider doesn’t stop the Player yet, though. One way of making
GameObjects interact with Colliders in Unity is to add a Collider2D and a
Rigidbody2D component, but since we don’t need physics, just collisions, we can instead add a
simple collision check around the Walk method’s movement loop in our GridController class.
// …
// BoxCast from the character's center, in the desired direction, to check for collisions.
var origin = transform.position + new Vector3(0.5f, 0.5f);
var size = Vector2.one / 2f; // Half box size to avoid false positives.
var hit = Physics2D.BoxCast(origin, size, angle: 0f, direction, distance: 1f);
if (hit) {
        // Nothing to do, don't move.
} else {
        // Move towards target, 1/16th tile per frame
        var target = transform.position + direction;
        while (transform.position != target) {
                transform.position = Vector3.MoveTowards(transform.position, target, 1f / 16f);
                yield return null; // Wait for one frame before continuing.
        }
}
// …
This code addition simply makes sure we only run the movement loop if the Player won’t collide with anything at the target position.

Collisions limit Player movement
If you enter Play Mode now, the Player character is no longer able to pass through the tiles you defined Collision Shapes for in your tilesets.
Occlusion with Tile Masks
A non-essential improvement we can make is to let the Player walk behind/under things like roofs and treetops – since my Characters layer is on top of all other layers, the Player character currently renders on top of everything.
You could add another Tile Layer above the Characters layer, and make sure everything that should occlude the Player character is placed in that layer, and not its original layer.
I find non-semantic layers like that tedious, repetitious, and error-prone, though.
Let’s define occluding tiles directly in the tileset, instead; we’ll use a prefab with a
SpriteMask component, and a small script that synchronises the SpriteMask’s Sprite with
the tile’s Sprite.
Create a script called TileMask:
using UnityEngine;
using UnityEngine.Tilemaps;

[RequireComponent(typeof(SpriteMask))]
public class TileMask : MonoBehaviour {
        void Start() {
                var tilemap = GetComponentInParent<Tilemap>();
                var position = Vector3Int.FloorToInt(transform.localPosition);
                var sprite = tilemap.GetSprite(position);
                GetComponent<SpriteMask>().sprite = sprite;
                transform.localPosition += (Vector3)(sprite.pivot / sprite.pixelsPerUnit);
        }
}
Since the Sprite’s pivot will be read as centered, the Transform’s localPosition is
aligned to the center of the tile.
Now create a new prefab called Mask, and add your new TileMask component to it. A
SpriteMask component will automatically be added as well, because of the RequireComponent
class attribute.
Finally, in your tileset in Tiled, select all tiles that should occlude objects, and set their Type to Mask. This will make KITTY instantiate your new Mask prefab at every one of those tiles’ positions in your tilemap.

The Player is masked by the Mask tiles.
This approach of defining the occlusion directly in the tileset means you avoid repeating the occlusion definition, don’t have to wrestle with multiple layers, and can’t forget to make a tile in the tilemap occlude the Player.
Note
If you make changes to a prefab for tileset tiles, you need to reimport the tileset, which will automatically reimport the tilemap as well.
Interactions
We have a working prototype for a playable game, now! There’s no way for the Player to interact with the world, though. Let’s add signs the Player can read.
Custom Properties
Tiled allows you to add Custom Properties to almost everything, from maps and layers to tiles and objects.
KITTY allows you to assign the value of a Custom Property to a field in one or more of your classes,
through the [TiledProperty] attribute. We’ll use that to define the text on the signs.
Simple Sign
Create a new prefab called Sign, add a child with a Canvas component, and add a
child with a Text component to the Canvas child. Configure the text to be visible
even when there’s a few lines in the Text component, then disable the Canvas child
GameObject so it doesn’t start visible.
Feel free to make it look fancy; I added a background panel and a custom font.
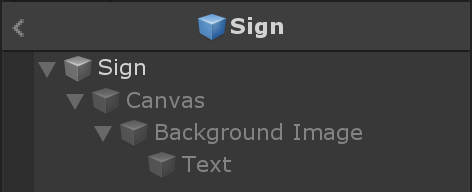
My Sign prefab
Create a new Sign C# script, and add this component to the root of the Sign prefab:
using System.Collections;
using KITTY;
using UnityEngine;
using UnityEngine.UI;

public class Sign : MonoBehaviour {
        public GameObject canvas;
        [TiledProperty] public string text;

        public IEnumerator Interact() {
                // Enable the text canvas, and wait for the player to press the "Fire1" button.
                canvas.SetActive(true);
                GetComponentInChildren<Text>().text = text;
                while (!Input.GetButtonDown("Fire1")) {
                        yield return null;
                }
                canvas.SetActive(false);
        }
}
Remember to add a reference to your Canvas GameObject in the Sign component’s
inspector.
The [TiledProperty] attribute lets us assign the value of any Custom Property named Text
(case-insensitive, ignoring whitespace) directly from an object or tile in Tiled directly to our
public string text property. Nice.
We’re returning an IEnumerator again, because we want the GridController to wait for the
“Fire1” button to be pressed before enabling its Update method again.
Note
The default “Fire1” buttons are Ctrl, left mouse button, and joypad button 1.
We need to add a few lines of code to the GridController class as well. It needs to wait for the
Interact coroutine to finish when there is a BoxCast hit, and the collider that was hit also
has a Sign component.
// …
if (hit) {
        // Interact with a Sign, if any.
        var interaction = hit.collider.GetComponentInParent<Sign>()?.Interact();
        if (interaction != null) {
                yield return StartCoroutine(interaction);
        }
} else {
// …
Coroutines can start other coroutines, and even wait for them; the GridController’s Walk
method will now wait for the Sign’s Interact method to complete before enabling the
GridController’s Update method again with enabled = true;
We fetch the Sign component through collider.GetComponentInParent<Sign>() because KITTY
automatically adds one or more child Colliders – based on a tile’s Collision Shapes – to
instantiated prefabs.
Back to Tiled; we need to make sure that in our tileset, our sign tile has the Type
Sign, and has a full-tile Collision Shape. You can add a default string Custom
Property named Text, as well; its value will be used as sign text if you don’t give a sign a
specific text.
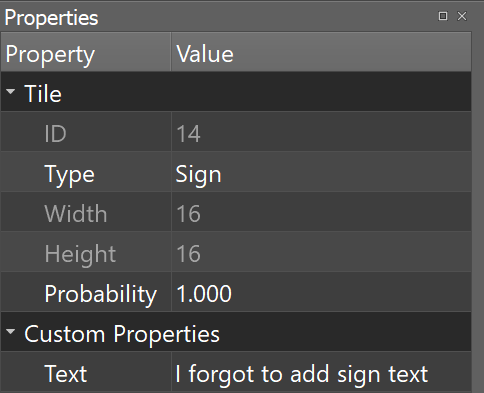
Properties for Sign tile
If you have several different sign tiles you want to use, just repeat the process for all of them.
Now, add as many Tile Object Signs as you want to your tilemap, and add or change their Text Custom Property individually.

Signs showing a text box and waiting for input
Switch back to Unity, enter Play Mode, and walk into a sign; with a few lines of code and a single Custom Property, you’re now able to interact with the game world!
Directional “Sign”
Before we start animating the Player, let’s improve our Sign component a bit;
depending on how you look at it, a stationary NPC that faces the Player when speaking is
really just a Directional “Sign”. For my NPC, I went with four directional sprites of May from
Pokémon FireRed/LeafGreen.
Instead of having separate classes and prefabs for Signs and stationary NPCs, we can
just make our Sign component face the Player if it has different frames for the four
directions.
// …
public IEnumerator Interact(Transform actor) {
        // Display a specific direction frame to face the player.
        var animator = GetComponentInChildren<Animator>();
        var direction = actor.position - transform.position;
        var frame = 0;
        if      (direction == Vector3.down)  { frame = 0; }
        else if (direction == Vector3.left)  { frame = 1; }
        else if (direction == Vector3.up)    { frame = 2; }
        else if (direction == Vector3.right) { frame = 3; }
        animator?.SetInteger("Start", frame);
        animator?.SetInteger("End", frame);

        // Enable the text canvas, and wait for the player to press the "Fire1" button.
        // …
}
// …
To determine the direction the “Sign” should face, we need to know what Transform is
interacting with it; so, a Transform parameter has been added to the Interact method.
Depending on the direction, we select one of the four directional frames for our NPC “Sign”.
KITTY automatically adds a preconfigured Animator component to the automatically created
Renderer GameObject of every Tiled tile object that’s based on an animated tile.
We can set a subsequence of frames for this Animator at any time by specifying its Start and
End properties. By setting both to the same value, the “animation” effectively turns into a
single frame – the directional frame we want.
The GridController needs to pass in its Transform when calling Interact, too.
var interaction = hit.collider.GetComponentInParent<Sign>()?.Interact(transform);
The only thing you need to do in Tiled is to define a short animation for your NPC “Sign”, with one frame for each of the four directions. Make sure the main tile has the Type Sign, and a defined collision shape.
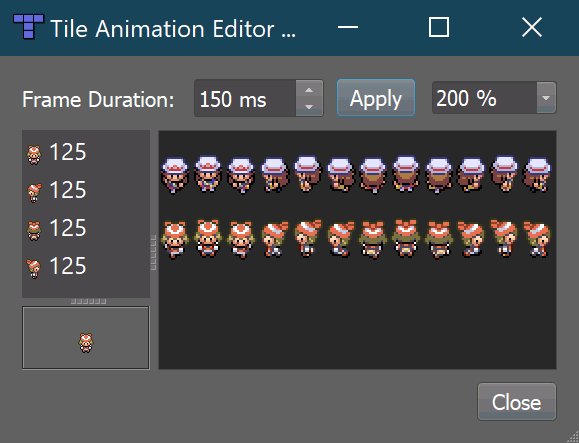
Four animation frames; one for each direction
Place a few NPC “Sign”s, add a string Custom Property named Text with whatever
text you want, and they will turn to face the Player when interacted with in Unity’s
Play Mode.
NPC “Sign” in action
She spins! By default, objects based on animated tiles will play out their full sequence of frames
in a loop. If you want to have the “Sign” start facing one direction, just set the
Start and End parameters of the Animator to the same frame number in a Start method.
Remember to check whether the GameObject has an Animator component, first.
Tip
Using animator?.SetParameter will not call SetParameter if animator == null.
Animating the Player
We’ll use the same approach as the directional “Sign” for animating the
Player; setting the Start and End parameters of the automatically created child
Animator component to select animation sequences.
Player sprite animation
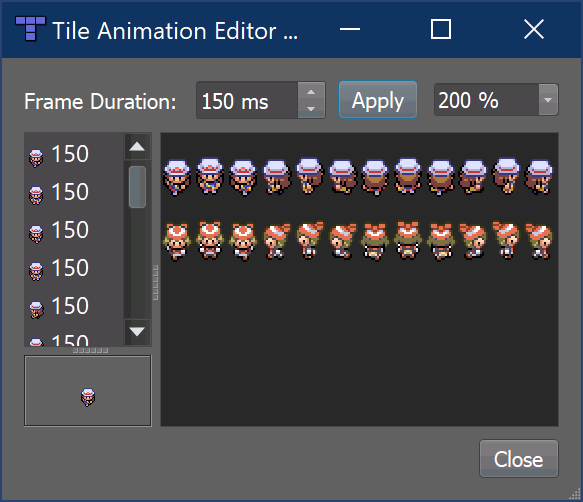
Leaf from Pokémon FireRed/LeafGreen has three walking frames for each of the four directions, but her actual animation uses the middle frame twice.
Facing
Since Leaf has four walking frames per direction in her defined tile animation, the frame indices
for each direction have a stride of four instead of one. In our GridController’s Walk
method:
// …
enabled = false;

// Animation frame sequence depends on directions.
var animator = GetComponentInChildren<Animator>();
var frame = 0;
if      (direction == Vector3.down)  { frame =  0; }
else if (direction == Vector3.left)  { frame =  4; }
else if (direction == Vector3.up)    { frame =  8; }
else if (direction == Vector3.right) { frame = 12; }
// …
Now that we have a frame offset for the direction, we can set a static frame facing that direction if the Player collides with anything:
// …
if (hit) {
        // Set static frame facing the collider.
        animator?.SetInteger("Start", frame + 1);
        animator?.SetInteger("End", frame + 1);
// …
I add 1 to the frame offset because Leaf’s animation frames are left-foot, center,
right-foot, center, and I want her static frame to be a center frame.
It’s important to set the Animator parameters before a potential Interact coroutine is
started; that way, the Player will face a Sign, an NPC, or any other
interactable object while waiting for the Interact coroutine to finish.
Animation
Animating your character’s movement is done in the same way as setting a static frame, except the
Start and End parameters are different from each other.
To animate Leaf with her four frames of animation, I simply define the subsequence of directional frames I want to play while she moves, wait for her to finish moving, and reset to a directional static frame:
// …
} else {
        // Set walking animation frame sequence.
        animator?.SetInteger("Start", frame);
        animator?.SetInteger("End", frame + 3);

        // Move towards target, 1/16th tile per frame
        // …

        // Reset to idle.
        animator?.SetInteger("Start", frame + 1);
        animator?.SetInteger("End", frame + 1);
}
// …
Now we’ve defined both an idle animation and a walking animation, for all four directions, in six lines of code. Wonderful!

Walking animation plays when the Player moves
Note
Leaf, like May, initially plays her entire animation sequence in a loop. If you want to
have your character face a specific direction from the start instead, just set both the
Start and End parameters to the frame index you want in a Start method.
Recap
That concludes this tutorial in using Tiled and KITTY to make a small top-down game with Unity.
Let’s go through what we’ve made.
Files
We don’t really have that many files, despite having a small functioning game.
Project folder contents
The contents of my Assets/Maps/Tutorial folder looks like this. Yours should be roughly
similar, though probably with a different number of tilesets and images.
Scene Hierarchy
The scene Hierarchy just contains the tilemap prefab, and nothing else.
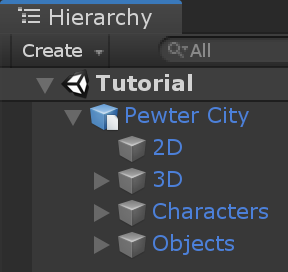
Final scene Hierarchy
As you can see, there are no floating GameObjects to keep track of. I recommend making one fully
self-contained scene per tilemap – that way, you can change mechanics as you see fit from one map
to the next.
Code
Finally, we ended up with just three scripts to describe all the behaviour in our game.
using System.Collections;
using UnityEngine;

public class GridController : MonoBehaviour {
        ///<summary>Walk to tile in `direction`.</summary>
        IEnumerator Walk(Vector3 direction) {
                // Disable the Update method until we're done walking one tile.
                enabled = false;

                // Animation frame sequence depends on directions.
                var animator = GetComponentInChildren<Animator>();
                var frame = 0;
                if      (direction == Vector3.down)  { frame =  0; }
                else if (direction == Vector3.left)  { frame =  4; }
                else if (direction == Vector3.up)    { frame =  8; }
                else if (direction == Vector3.right) { frame = 12; }

                // BoxCast from the character's center, in the desired direction, to check for collisions.
                var origin = transform.position + new Vector3(0.5f, 0.5f);
                var size = Vector2.one / 2f; // Half box size to avoid false positives.
                var hit = Physics2D.BoxCast(origin, size, angle: 0f, direction, distance: 1f);
                if (hit) {
                        // Set static frame facing the collider.
                        animator?.SetInteger("Start", frame + 1);
                        animator?.SetInteger("End", frame + 1);

                        // Interact with a Sign, if any.
                        var interaction = hit.collider.GetComponentInParent<Sign>()?.Interact(transform);
                        if (interaction != null) {
                                yield return StartCoroutine(interaction);
                        }
                } else {
                        // Set walking animation frame sequence.
                        animator?.SetInteger("Start", frame);
                        animator?.SetInteger("End", frame + 3);

                        // Move towards target, 1/16th tile per frame
                        var target = transform.position + direction;
                        while (transform.position != target) {
                                transform.position = Vector3.MoveTowards(transform.position, target, 1f / 16f);
                                yield return null; // Wait for one frame before continuing.
                        }

                        // Reset to idle.
                        animator?.SetInteger("Start", frame + 1);
                        animator?.SetInteger("End", frame + 1);
                }

                // Enable the Update method after we're done walking one tile.
                enabled = true;
        }

        void Update() {
                var input = new Vector2(Input.GetAxisRaw("Horizontal"), Input.GetAxisRaw("Vertical"));

                // Move one tile in an input direction, if any, preferring horizontal movement.
                if (input.x != 0f) {
                        StartCoroutine(Walk(new Vector3(input.x, 0).normalized));
                } else if (input.y != 0f) {
                        StartCoroutine(Walk(new Vector3(0, input.y).normalized));
                }
        }
}
using UnityEngine;
using UnityEngine.Tilemaps;

[RequireComponent(typeof(SpriteMask))]
public class TileMask : MonoBehaviour {
        void Start() {
                var tilemap = GetComponentInParent<Tilemap>();
                var position = Vector3Int.FloorToInt(transform.localPosition);
                var sprite = tilemap.GetSprite(position);
                GetComponent<SpriteMask>().sprite = sprite;
                transform.localPosition += (Vector3)(sprite.pivot / sprite.pixelsPerUnit);
        }
}
using System.Collections;
using KITTY;
using UnityEngine;
using UnityEngine.UI;

public class Sign : MonoBehaviour {
        public GameObject canvas;
        [TiledProperty] public string text;

        public IEnumerator Interact(Transform actor) {
                // Display a specific direction frame to face the player.
                var animator = GetComponentInChildren<Animator>();
                var direction = actor.position - transform.position;
                var frame = 0;
                if      (direction == Vector3.down)  { frame = 0; }
                else if (direction == Vector3.left)  { frame = 1; }
                else if (direction == Vector3.up)    { frame = 2; }
                else if (direction == Vector3.right) { frame = 3; }
                animator?.SetInteger("Start", frame);
                animator?.SetInteger("End", frame);

                // Enable the text canvas, and wait for the player to press the "Fire1" button.
                canvas.SetActive(true);
                GetComponentInChildren<Text>().text = text;
                while (!Input.GetButtonDown("Fire1")) {
                        yield return null;
                }
                canvas.SetActive(false);
        }
}
Going Forward with KITTY
KITTY can do much more than just top-down orthogonal grid-based games.
With what you’ve learned in this tutorial, you can go on to make platformers with complex collision shapes, turn-based strategy games with building mechanics, 3D tile-based first person games, or even improve upon KITTY itself.
Good luck!
This Tutorial
You should be able to build on what you’ve made with this tutorial.
For your next step, I have a few suggestions:
Make Doors “warp” the Player to different maps by loading entire scenes by their name
Expand the text boxes used for Signs to support multiple pages, prompts, variables, and so on
Add NPCs that walk around randomly
KITTY Examples
We currently only have one published game made with KITTY.
It’s called PiRATS, it got second place in Mini Jam 28, and it’s made by Fmlad and myself.
The game is short but kinda neat, we’d be happy if you would check it out~
Thank you again for using KITTY!
KITTY is just a hobby project I’ve been working on for a while.
It means a lot to me that you got through this tutorial, so thank you.
If you spot anything weird or wrong in this tutorial, or you find a bug or missing feature in KITTY, you’re welcome to contact me.